✨专业 WordPress 开发,定制建站,高效上线,合作即享优化服务!🚀


目标1:开通root远程密码登录
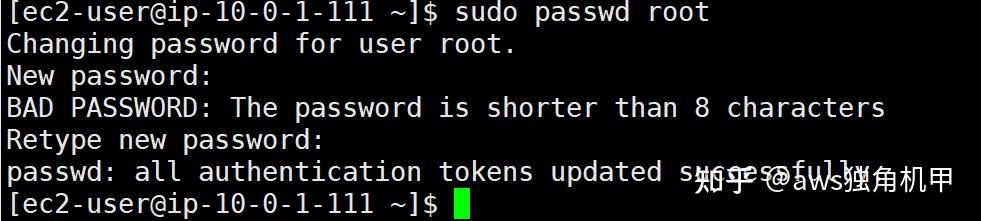
1、设置root账号密码
输入如下命令:sudo passwd root,然后会提示你输入新密码,输入一个你要设置的root的密码,需要你再输入一遍进行验证。
sudo passwd root
接下来,切换到root身份,输入如下命令:su root ,输入你刚刚设置的密码
su root

2、让root能远程登录
vim /etc/ssh/sshd_config
- 把
PasswordAuthentication设置为yes - 把
PermitRootLogin设置为yes
特别注意:以上2个设置,缺一不可。如果页面没有这个选项
看到 sshd_config文件中确实没有 PermitRootLogin yes这一行(只有被注释的 #PermitRootLogin prohibit-password),但有 PasswordAuthentication no这一行(未被注释)。
解决思路:
因为你的目标只是允许用密码登录(不管是 admin 还是 root),所以只需要修改 PasswordAuthentication,不需要强制找 PermitRootLogin(除非你要允许 root 远程登录,而 AWS 默认可能限制了 root 直接 SSH 登录)。
步骤 1:修改 PasswordAuthentication(必须做)
在截图中,PasswordAuthentication no是未注释的(黄色字体),所以直接改它:
- 按
i进入编辑模式(左下角显示-- INSERT --)。 - 找到
PasswordAuthentication no,把no改成yes。(如果这行不存在,就手动添加一行
PasswordAuthentication yes,但截图里已经有了,所以直接改。)
步骤 2:(可选)如果要允许 root 远程登录,添加/修改 PermitRootLogin
AWS 默认可能禁止 root 直接 SSH 登录,所以如果以后想直接用 root 登录(不建议,最好用 admin + sudo),可以:
- 找到被注释的
#PermitRootLogin prohibit-password,把注释#去掉,然后把prohibit-password改成yes。即改成:
PermitRootLogin yes - 如果这行完全不存在,就手动在合适位置(比如
PasswordAuthentication附近)添加:PermitRootLogin yes
步骤 3:保存并退出
- 按
ESC(退出编辑模式)。 - 输入
:wq并回车(保存并退出)。
3、重启一下sshd服务
sudo /sbin/service sshd restart
到此,可以用root身份的账号密码直接登录EC2的服务器了,不需要使用密钥了!
