


Configuring WooCommerce taxes isn't difficult; the challenge is that many sites mix up price display, checkout calculations, and regional tax rates, resulting in either inconsistent tax-inclusive display on the frontend or troublesome order reconciliation in the backend. This tutorial explains enabling taxes, tax classes, rate tables, and display logic in sequence, so you can set everything up correctly in one go.
First, decide whether your prices are tax-inclusive or tax-exclusive
This is the most easily overlooked step in tax settings. If you quote prices for the European or UK market, you will often encounter the need for tax-inclusive display; if your pricing is more geared toward wholesale inquiries or cross-border settlement, tax-exclusive display is often clearer. This decision will directly affect how numbers appear on the product page, cart, and checkout page.
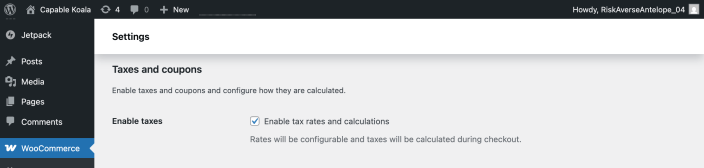
First, enable taxes in WooCommerce general settings. Image source: Screenshot from official WooCommerce documentation, used for tutorial reference and illustration.
Step 1: Enable taxes and open the tax tab
After checking "Enable tax rates and calculations" in WooCommerce general settings, a dedicated tax settings page will appear in the backend. If you don't see the Tax tab, it's usually because this hasn't been enabled yet.
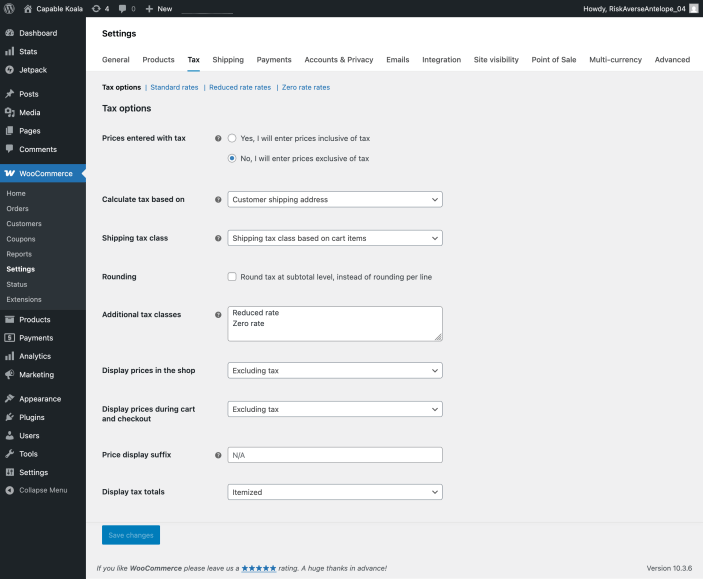
The tax options page lets you configure the price input method, checkout calculation basis, and display logic. Image source: Screenshot from official WooCommerce documentation, used for tutorial reference and illustration.
Step 2: Set the checkout calculation basis and price display method
Whether tax is calculated based on the shop address, the customer's shipping address, or the customer's billing address at checkout directly impacts cross-border orders. At the same time, confirm whether tax-inclusive prices are displayed on the product page and cart. Showing “tax included” on the frontend but adding tax again at checkout is the scenario most likely to trigger complaints.
Step 3: Set up standard tax rates and additional tax classes
If different products have different tax rates — for example, physical goods and digital goods follow different rules — you need to split them into separate tax classes. When manually maintaining the rate table, it's recommended to start with your primary market and only enter the rates you explicitly need to bear or display, rather than entering all regions at once.
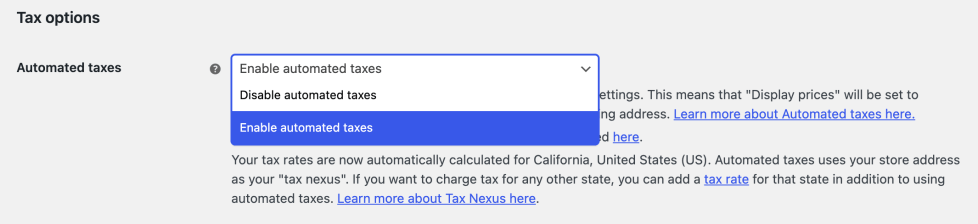
Automated taxes are suitable for sites that want to reduce manual maintenance. Image source: Screenshot from official WooCommerce documentation, used for tutorial reference and illustration.
Step 4: Test tax-inclusive and tax-exclusive scenarios using a real address
Test at least one local address, one tax-exempt address, and one cross-border address. Check whether the tax amounts on the product page, cart, checkout page, and order email are consistent, and pay special attention to whether shipping is also taxed.
Pre-launch checklist
- First, verify whether the price entry method is tax-inclusive or tax-exclusive.
- Keep the tax wording consistent across the product page, cart, and checkout page.
- The tax rates for your primary market have been actually entered and tested.
- Whether shipping is included in the tax calculation aligns with local regulations.
- Finance or customer support can understand the tax breakdown in orders.
Tax settings are not isolated — they affect the cart, checkout page, and order notifications. After configuring tax rates, we recommend testing with Shipping zone settings Test with different addresses, then return to Order status and refund process Check whether the refund amount, tax amount, and email records are consistent. If you are still in the setup stage, you can first complete the WooCommerce basic setup。
Frequently asked questions
Can WooCommerce sell normally without enabling taxes?
Technically yes, but if your market or checkout process needs to display tax amounts, not enabling taxes will make quoting, invoicing, and customer support explanations confusing.
Which is better: tax-inclusive or tax-exclusive display?
It depends on the target market and customer expectations. Consumer retail often leans toward tax-inclusive display, while wholesale or cross-border inquiry scenarios more commonly show tax-exclusive pricing. The key is consistency across all front-end pages.
How to choose between automated taxes and manual taxes?
When you have few regions and stable rules, manual taxes are more controllable. When you have many regions and tax rules change frequently, automated taxes can reduce maintenance costs, but you still need to verify order by order before going live.
Join the discussion
You must log in to post a comment.
After logging in, you can join the discussion. New users can register an account for free.
Do not post spam comments, advertisements, or content with malicious links. Comments must comply with relevant laws, regulations, and community guidelines.